
The first set of cake pops I prepared dropped from their sticks, individually, into a bowl of melted red candy. Although Christmas cake pops appear intricate, in reality, they consist of nothing more than cake crumbs combined with frosting, rolled into ball shapes, and then dipped and adorned. With the knowledge of three simple steps, you can create a delicious holiday treat that is easy to prepare prior to your event, and children will enjoy participating in applying sprinkles.
The following is a tested recipe for approximately 40 Christmas cake pops that can be created using a box cake mix and a simple, homemade buttercream. In addition to the recipe, I am also providing you with 8 fun, festive designs (such as snowmen, ornaments, reindeer, etc.), a “fix-it” guide for when your cake pops begin to crack or fall off the stick, as well as the specific length of time that you can store your cake pops.
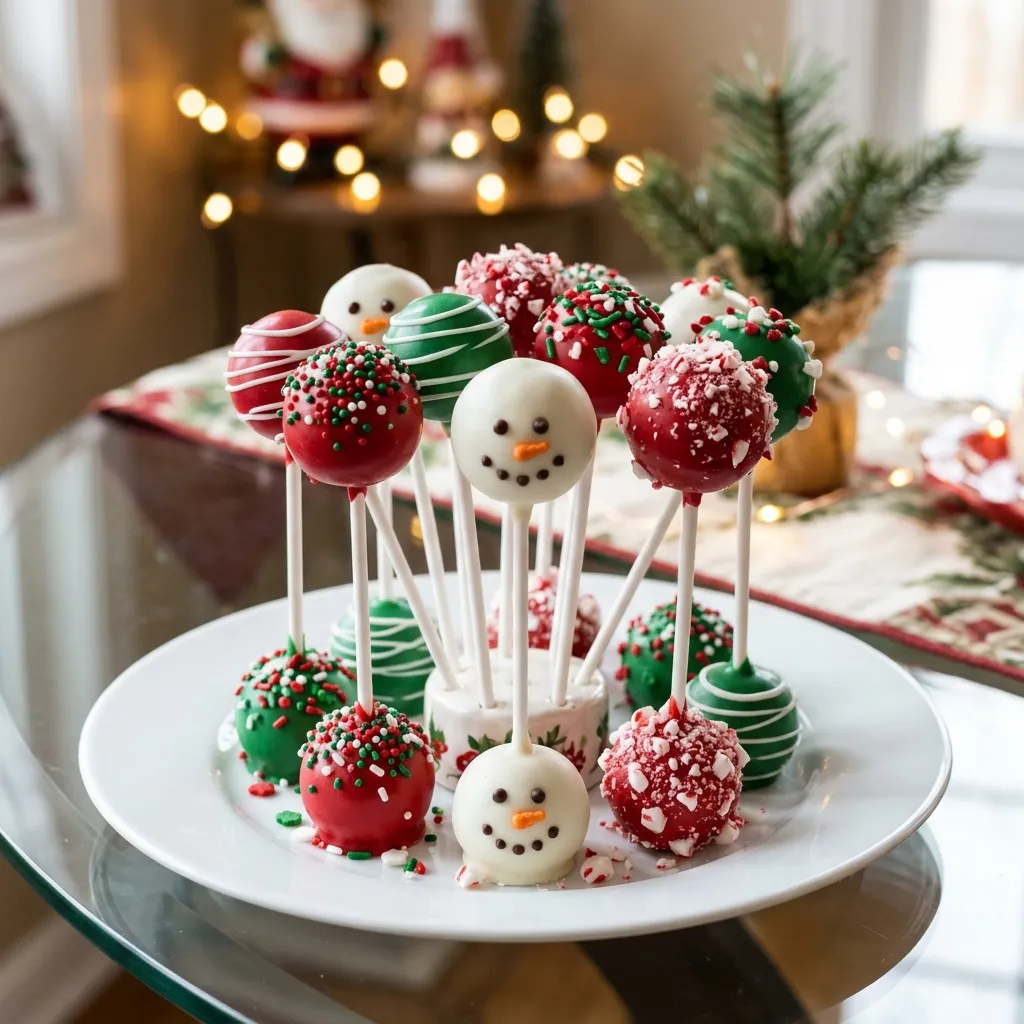
Christmas cake pops at a glance
• Makes: about 40 pops (1 tablespoon each)
• Total time: about 2 1/2 hours, most of it cooling and chilling
• Difficulty: easy, with a little patience at the dipping step
• Key ingredients: vanilla cake mix, buttercream, red, green and white candy melts
• Make ahead: yes, up to 3 days at room temperature or 6 weeks in the freezer
In this guide:
- Why This Christmas Cake Pop Recipe Works
- Ingredients and Easy Swaps
- Tools You Need for Cake Pops
- How to Make Christmas Cake Pops Step by Step
- 8 Christmas Cake Pop Designs to Try
- What’s New With Cake Pops This Christmas
- Why Do Cake Pops Crack or Fall Off the Stick?
- How to Store and Freeze Christmas Cake Pops
- Christmas Cake Pops Recipe Card
- Christmas Cake Pops FAQ
Create a batch of these treats on the weekend, and you can keep a tray of these edible holiday decorations around for every celebration through Christmas Eve.
Why This Christmas Cake Pop Recipe Works
A good cake pop depends upon its texture. Your cake ball should be as soft as fudge, not as sticky as wet dough. When you put too much frosting in the mix, the balls will become too heavy and too greasy. Heavy balls will fall off of your sticks. Therefore, I only use 1/3 cup of frosting for each box of cake, and then I can always add another spoonful of frosting if needed.
The next secret to making cake balls is temperature. Cake balls must be firm enough to allow the stick to remain in place, yet not so cold that the warm coating will shrink around the ball and cause it to crack. By chilling for 15 minutes, and allowing them to sit at room temperature for 5 minutes prior to dipping, you can avoid each of these potential issues.
The final trick is the “glue” trick. Dipping the end of each pop stick into melted candy prior to pushing it into the cake pop ball will cause the two pieces to bond after the candy hardens. This will take only a couple of seconds for every pop and will save the entire batch.
Ingredients and Easy Swaps
You only need a handful of ingredients. Here is what each one does:
- Vanilla cake mix (15.25 oz box): The ingredients (eggs, oil and water) listed on the box are also required. Boxed mixes provide a soft, consistently-baked product that produces fine crumbs.
- Homemade buttercream: Butter, powdered sugar, a little bit of milk and vanilla. This will hold your crumbs together and taste better than store-bought canned frosting.
- Candy melts: Twelve ounces each of white, red and green candy melts. They will melt evenly and become firm at room temperature without being tempered.
- Shortening or coconut oil: a little thins the coating so it coats evenly and does not weigh the pop down.
- Lollipop sticks and Christmas sprinkles: 6-inch sticks are the easiest size to hold and display.
Out of something? This chart shows the swaps I’ve tested and what changes:
| Ingredient | Swap | What changes |
|---|---|---|
| Vanilla cake mix | Red velvet, chocolate or spice cake mix | Same method; red velvet looks great when you bite in |
| Homemade buttercream | 1/3 to 1/2 cup store-bought vanilla frosting | Sweeter and a bit softer; chill the balls 5 minutes longer |
| Cream cheese frosting | Use only if you will keep the pops in the fridge | Tangy flavor, but the pops can’t sit out more than 2 hours |
| Candy melts | Chocolate chips + 1 tbsp oil per cup | Richer taste, softer shell; store in a cool spot |
| Shortening | Coconut oil or dipping aid wafers | Works the same; add a little at a time |
Tools You Need for Cake Pops
A simple set of utensils will greatly assist in the process. A 9×13 inch pan is ideal for making the cake; a 1 tablespoon cookie scoop ensures uniform ball sizes; and two baking sheets lined with parchment paper hold the rolled balls while they chill. When applying the coating, a narrow and deep microwaveable container is preferred over a wide bowl as it allows you to apply enough coating to completely coat each ball in one single dip.
You will also need a place to allow your pops to dry. The most common option is a block of Styrofoam. You may also use a cardboard box with small holes on top, or even purchase a cake pop stand, especially if you intend to prepare these treats annually.
How to Make Christmas Cake Pops Step by Step
The entire process is described simply in plain language. All of the exact measurements can be found on the recipe card below.
1. Bake and Cool the Cake
Bake the cake mix in a greased 9″ x 13″ baking dish as directed by the manufacturer, typically for 28-33 minutes at 350 degrees Fahrenheit (175 degrees Celsius), until a toothpick inserted into the center of the cake is removed without any batter adhering to it. Allow the cake to cool completely, for approximately 1 hour. If the cake is still warm when you begin mixing, then the cake will turn into a sticky paste.
2. Make the Buttercream
Cream 4 tablespoons of softened butter, add 1 cup of confectioner’s sugar, 1 tablespoon of milk and 1/2 teaspoon of vanilla. This will produce approximately 2/3 cup. It is likely you will have leftover frosting.
3. Crumble and Mix
Cut away the dark and crusty edges of the cake, then use your fingers to break up the cake into very small pieces. Combine 1/3 cup of buttercream into the broken up cake using clean hands. Gently squeeze a small portion of the mixture in your hand; if it forms a ball similar to how you would form a ball of play dough, then you have completed this step. If the mixture does not stay formed in your hand, add additional amounts of buttercream (1 tablespoon per addition) until the mixture stays together.
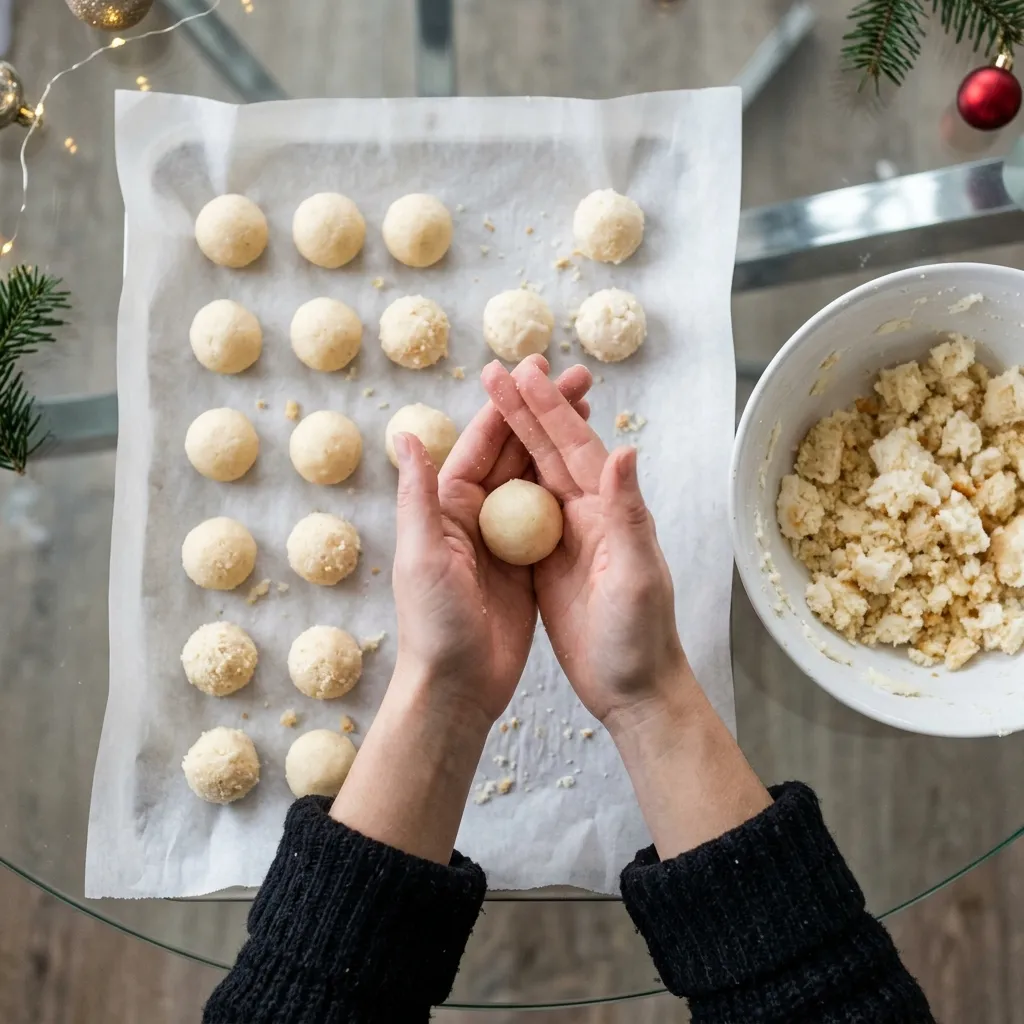
4. Roll and Chill the Balls
Scoop tablespoon-sized portions (approximately 25 grams each) of dough and use your hands to form each portion into a ball by rolling it around in your palm. Once formed into balls, place the portions on the prepared baking sheets and put them in either the refrigerator for 15 minutes or the freezer for 10 minutes. At this point, you want the portions to be firm, but not frozen.
5. Glue in the Sticks
Melt approximately 1/4 of a cup of candy melts. For every stick, dip the end into the candy melt by roughly 1/2 of an inch and push that end halfway into a cake ball. Place the cake pops back into the refrigerator for 10 minutes to allow the candy melt to harden and act as an adhesive.
6. Melt the Coating Slowly
Melt each color individually in a small deep dish using the 50% power setting for 30 second increments, and mix between every increment. When the coating seems too thick, add 1/2 tsp. of shortening at a time until the coating falls from your spoon in a smooth ribbon. While it melts, allow your cake pops to sit on the counter for approximately five minutes so they are cool, but not icy.
7. Dip, Tap and Decorate
Hold the stick, lower the pop directly into the coating until it meets the stick, and bring the pop straight back up. Do not swirl. Lightly tap your wrist (not the stick) as you turn the pop to allow any additional coating to drip off. Immediately add sprinkles after bringing the pop out of the coating, prior to the shell setting, then place the pop into the styrofoam. At room temperature, the shell will set in approximately 10-15 minutes.

If this is your first time dipping, start with plain white pops and sprinkles. You will find that after 5 or 6, your hands will get used to the movement and then you can try some of the design ideas listed below.
8 Christmas Cake Pop Designs to Try
Every design starts with the same basic dipped pop. Here are my favorites, listed in order of speed and level of detail.
| Design | Coating | Extra time | Kid-friendly? |
|---|---|---|---|
| Sprinkle ornaments | Red, green or white | None | Yes |
| Candy cane drizzle | White + red drizzle | 5 min | Yes |
| Christmas trees | Green + white drizzle | 10 min | Yes |
| Snowmen | White | 15 min | With help |
| Reindeer | Chocolate | 20 min | With help |
1. Sprinkle Ornament Cake Pops
This is the easiest one. Dip your pops in either red, green, or white and then roll them in either nonpareils or sanding sugar while the pop’s coating is still wet. Then, tie a small ribbon bow directly below the bottom of each pop. They will appear as miniature Christmas tree ornaments.
2. Candy Cane Cake Pops
Dip the cake pops into the melted white candy, allow them to harden, then use a spoon to create thin red lines over the top of each one. Before these red stripes harden, sprinkle crushed peppermint candies on top. The cool peppermint flavor complements the sweet vanilla taste of the cake nicely.
3. Christmas Tree Cake Pops
To make your tree look like it is decorated with garland, dip the cake pop into green and then zigzag white candy over the top. To decorate it like a Christmas tree with ornaments, add some round sprinkles to the cake pop. Also, place a single star sprinkle at the very top. If you would like a cake pop that looks more like an actual cone, you may gently roll the cake balls into a cone-like shape prior to placing them in the refrigerator.
4. Snowman Cake Pops
Dip in white and allow to fully set. Use a toothpick with melted chocolate to place two dots as eyes, a small smile, and apply an orange sprinkle as the nose. Wrap a thin piece of red fruit leather around the stick to form the scarf.
5. Reindeer Cake Pops
Use chocolate cake mix and either brown candy melts or milk chocolate. Push two halves of a mini pretzel into the chocolate coating while it is still soft to create “antlers.” Add candy eyes, and use a red candy to form the “nose.”
6. Santa Hat Cake Pops
Dip the entire pop into red candy and allow it to dry. Once dried, dip only the upper quarter of the pop into white candy. Roll that portion in white sanding sugar so that it appears fuzzy. Place a mini marshmallow on the side to represent the pom-pom.
7. Gingerbread Cake Pops
Begin by using a spice cake mix, then combine the crumbs with one teaspoon of ground ginger and dip the finished balls into white. Finally, top each piece with a dusting of cinnamon sugar. Each one will have the flavor profile of a gingerbread cookie.
8. Winter Bear Cake Pops
Roll the ball a little flatter, dip in chocolate, and then place two chocolate chips for ears. Add a white candy “knit hat” to the top of the ball using piping, and also include candy eyes. This look is all over social media this year (more on that below).
Need more ideas for your holiday dessert table? They will be delicious alongside a stacked gingerbread Christmas tree and can also be used as gifts inside a Christmas cookie box.
What’s New With Cake Pops This Christmas
Cake pops have been very popular this year. On November 5th, Starbucks launched their 2026 holiday menu with a new Bearista Cake Pop (a bear wearing a winter hat), which is created from vanilla cake and buttercream and covered in chocolaty icing. Tasting Table reviewed this product and stated that it costs $3.45. If you decide to create these at home, you will be able to produce approximately 40 of them for around the cost of buying five.
The data shows that there is a lot of excitement surrounding cake pops. According to Starbucks, on Valentine’s Day 2026, it sold more cake pops than any other day in its history. In addition, on Pinterest Trends, searches for “Christmas cake pops” increased approximately 200% from the previous month in the United States in early November, with the highest volume of searches anticipated to occur during late November and early December.
A second large trend in cake pop displays includes creating “edible Christmas trees” using cone-shaped foam forms for the cake pops to sit inside of, as well as providing a “hot cocoa bar” where people can use their cake pop to stir their cup of hot chocolate.
Why Do Cake Pops Crack or Fall Off the Stick?
Most cake pop issues arise due to temperature or weight. Cake pops will crack if you dip frozen cake balls into warm coatings, and cake pops may fall off their sticks if they are too large, too greasy, or not adequately attached to the stick. This chart can help you determine why your cake pops failed, as well as how to avoid those failures in future attempts:
| Problem | Likely cause | Fix |
|---|---|---|
| Shell cracks | Ice-cold cake balls in warm coating | Rest balls on the counter 5 minutes before dipping |
| Pop falls off the stick | Ball too big or too much frosting; no “glue” | 1-tbsp balls, less frosting, dip stick tips in candy first |
| Thick, lumpy coating | Overheated candy melts | 50% power, 30-second bursts; thin with shortening |
| Oil “leaks” or bubbles | Air trapped as the cake warms up | Prick the bubble with a toothpick and dab with candy |
| Greasy, heavy balls | Too much frosting | Mix in a handful of extra cake crumbs |
Wilton’s cake pop guide describes the same thing: cracks are almost always caused by an abrupt temperature shift. Tasting Table provides a useful guide with several tips for making cake pops, which is another resource to help you find solutions to potential problems. Additionally, The Daily Meal explains why dipping the stick first will keep the cake pop from falling off.
How to Store and Freeze Christmas Cake Pops
If you are looking for a dessert to prepare in advance, Christmas cake pops made with buttercream and candy melts may be the answer. They last several days if stored properly in an airtight container in a cool, dry place, out of direct sunlight and away from the oven.
| Where | How long | Tip |
|---|---|---|
| Room temperature | Up to 3 days | Buttercream + candy melts only, airtight container |
| Fridge | Up to 1 week | Required if you used cream cheese frosting |
| Freezer | Up to 6 weeks | Thaw overnight in the fridge, still in the container |
Cream cheese frosting is a perishable item. Therefore, the cold storage guidance from FoodSafety.gov and the 2-hour rule mean cream cheese pops cannot remain outside of refrigeration for more than two hours during a party. When thawing frozen pops, leave them in the sealed container until they have completely thawed. Condensation will form on the outside of the container rather than on the shell.
If you are planning an entire spread, cake pops go well with my Christmas charcuterie board ideas. You can also find additional dessert options and main dishes on our Christmas recipes page.
Christmas Cake Pops Recipe Card
Here is a list of the exact quantities, timeframes and procedures. You may print this out, or pin it for a future date.
Christmas Cake Pops
Ingredients
- 1 box vanilla cake mix 15.25 oz / 432 g
- eggs, oil and water as listed on the box
- 4 tbsp unsalted butter 56 g, softened
- 1 cup powdered sugar 120 g
- 1 tbsp milk
- 1/2 tsp vanilla extract
- 12 oz white candy melts 340 g
- 12 oz red candy melts 340 g
- 12 oz green candy melts 340 g
- 2-3 tsp vegetable shortening or coconut oil as needed to thin
- 40 lollipop sticks 6-inch
- Christmas sprinkles nonpareils, sanding sugar, star sprinkles
Equipment
- 9x13-inch (23x33 cm) baking pan
- 1-tablespoon cookie scoop
- 2 baking sheets lined with parchment
- Deep, narrow microwave-safe cup
- Styrofoam block or cake pop stand
Method
- Bake the cake mix in a greased 9x13-inch pan at 350°F (175°C) following the box directions, usually 28 to 33 minutes, until a toothpick comes out clean. Cool completely, about 1 hour.
- Beat the soft butter until creamy, then beat in the powdered sugar, milk and vanilla until smooth. You will have about 2/3 cup.
- Trim off dark edges and crumble the cake into fine crumbs. Mix in 1/3 cup of buttercream with your hands. Add more, 1 tablespoon at a time, only until the mixture holds together like play dough when squeezed.

- Scoop level tablespoons (about 25 g) and roll into smooth balls. Place on the lined sheets and chill 15 minutes in the fridge (or 10 minutes in the freezer) until firm, not frozen.
- Melt about 1/4 cup of candy melts. Dip the tip of each stick 1/2 inch into the candy and push it halfway into a cake ball. Chill 10 minutes to set.
- Melt each color separately in a deep cup at 50% power in 30-second bursts, stirring each time. Thin with 1/2 teaspoon shortening at a time until it drips off the spoon in a smooth ribbon. Let the cake pops sit on the counter about 5 minutes before dipping.
- Dip each pop straight down until the coating meets the stick, lift straight up, and gently tap your wrist while turning so the excess drips off. Add sprinkles right away and stand in styrofoam.
- Let the shells set 10 to 15 minutes at room temperature, then add drizzles or faces for snowmen, trees, reindeer or candy canes.


Nutrition
Notes
- Storage: up to 3 days at room temperature in an airtight container, 1 week in the fridge, or 6 weeks in the freezer (thaw overnight in the fridge, still covered).
- If you use cream cheese frosting, keep the pops refrigerated and don't leave them out more than 2 hours.
- Cracks come from ice-cold balls in warm coating; pops fall off when the balls are too big or have too much frosting.
- Nutrition is an estimate per cake pop.
Private Notes
Tried this recipe?
Let us know how it was!Christmas Cake Pops FAQ
What is the trick to making cake pops?
Use less frosting than you expect (about 1/3 of a cup for a whole box of cake) to make the balls firm and light. Then, use melted candy to glue each stick into place, chill the balls for 15 minutes, and allow them to rest for 5 minutes prior to dipping into the thin, smooth coating.
Do I refrigerate cake pops before dipping?
Yes, briefly. Chill the rolled balls for 15 minutes in the refrigerator (or 10 minutes in the freezer) to allow the ball to hold the stick, then chill again for 10 minutes after attaching the sticks. Before dipping, allow the balls to sit at room temperature for approximately five minutes to prevent cracks from forming in the shell.
How do I fix cracked cake pops?
With a toothpick, put a small amount of melted candy on top of the crack, or after the first layer has dried, dip the pop a second time. After that, add some sprinkles on top of the area. In the future, allow the cold cake balls to sit out of the refrigerator for 5 minutes prior to being dipped in the warm coating.
How do you make 3-ingredient cake pops?
Bake a boxed cake, then mix the cake crumbs with approximately 1/3 of a cup of store-bought frosting. Roll into balls. Refrigerate. Dip into melted candy melts. The eggs, oil and water for the cake are listed on the back of the box, so the cake pops themselves need only those three ingredients: cake, frosting and candy melts.
Can cake pops sit out overnight?
Pops that are fully covered in a candy coating and made with either buttercream or shelf-stable frosting can sit out overnight if kept in an airtight container in a cool area. On the other hand, pops made with cream cheese frosting should not be left at room temperature for more than 2 hours before being placed into the refrigerator.
How far ahead can I make Christmas cake pops?
You may prepare the pops up to three days prior to serving and store them at room temperature in a tightly closed container; alternatively you can store the pops in your refrigerator for up to one week. If you plan to keep them longer, you can store the finished pops in the freezer for up to six weeks. To defrost the pops, place them in the refrigerator overnight before serving.
Do cake pops need to be refrigerated?
Not if they are made with buttercream or store-bought frosting and coated in candy melts; those can stay at room temperature for up to three days. Cream cheese based pops must be kept cold and can only be left out for a maximum of 2 hours.
How many cake pops does one box of cake mix make?
A 15.25 ounce box makes approximately 40 cake pops with a single level tablespoon of the mixture used for each ball. With 1.5 level tablespoons, you can make roughly 28 larger cake pops. Larger cake balls weigh more and therefore are less likely to stay attached to their sticks.
Can I use chocolate instead of candy melts?
Yes. For a thin enough coating, melt chocolate chips with 1 tablespoon of vegetable or coconut oil per cup. This will produce a softer shell that could possibly melt if it gets too warm, therefore you should store the pops in a cool location.
How do you color candy melts for Christmas?
The most straightforward approach is to purchase both red and green candy melts. If you want to color white candy melts, use an oil-based candy color rather than a standard gel food color. Using water-based colors will cause the candy to seize and become very thick.
Why are my cake pops sweating?
Sweating occurs when you bring cold pops from the refrigerator into a warm room and moisture condenses on their surface. If you allow them to slowly reach room temperature in a sealed container, the droplets of water will form on the container rather than on the pops.
Time to Make Your First Batch
Christmas cake pops are definitely a project. But after the cake balls are rolled, the fun part is the dipping and decorating. I suggest putting on some music, laying out several small bowls with different colored sprinkles and allowing each person to create his or her own unique design. If you decide to make this recipe, please leave a star rating and tell me in the comments section below which design you liked best. Save this recipe on your Pinterest Christmas board for next year when you want to make these again. Also, take a look at my Christmas cookie ideas next.